While the craze over the first two lessened as time went on, I'm pretty sure we had those bundles of embroidery thread safety pinned to the knees of our jeans for most of the year (and probably into the next). There was just something about giving a handmade, custom, affordable gift to your friend that couldn't be compared... and, receiving a bracelet and knowing that your buddy had put in so much time and effort made it all the more special!
Fast-forward to this generation, and it almost seems foreign that kids would focus on something that doesn't require a charger, plug or batteries. Fortunately, there are companies like Choose Friendship that offer creative ways for kids to show their bond with friends or siblings, while displaying kindness, affection and thoughtfulness. Thank goodness!

From friendship bracelets to ribbon barrettes and more, the Choose Friendship Company combines simple crafting techniques into their ever-expanding product line to allow kids to engage in self-expression while promoting the message of friendship.
So, while I was familiar with the idea of making a bracelet out of little knots or winding pretty ribbon on a hair clip, even I was intrigued with the unique idea of making jewelry featuring your own custom pictures. But that was exactly what we were able to do with the arrival of the My Image Bracelet Maker!

Designed for ages 6 and up, the My Image Bracelet Maker is one of Choose Friendship's new releases that is sure to please any creative young minds.
Coming complete with images, tiles, elastic, a cutting mechanism and more, all it takes is an imagination and a little bit of time to assemble a personalized, one-of-a-kind masterpiece. As an added bonus, all of the parts and pieces store safely right in the Bracelet Maker so that they are never lost or in danger of spilling out.

Big Sister E and Little Sister B were immediately excited about the prospect of designing and creating a bracelet that would truly represent themselves and it wasn't long before we were getting started.
After Big Sister E selected the colored tiles that she liked best (they are included in six different colors)...

...we measured the elastic bands around her wrist to see just how long the bracelet should be for the best fit.

After popping the tiles onto the elastic bands, it was time for Big Sister E to decide on what images to use to make jewelry that would be all her own.
I love that the My Image Bracelet Maker not only comes with six pages of preprinted image cards featuring letters, icons, animals, food, flowers and much more...

...but that you can actually use just about any pictures that you choose. Select your own photographs, magazine pictures, internet images, drawings — whatever your heart desires!
My Image Bracelet Maker even includes easy-to-use online software that allows kids to upload and crop their favorite photos, then simply print them from a home printer (or send them to a local photo processing center) so that the options are pretty much limitless.
When it comes to cutting out the images, I also appreciate that the My Image Bracelet Maker includes an enclosed cutting mechanism right on the top.

Simply place the image of your choosing right into the box (which helps show exactly what will be cut), and push down on the yellow lever on the side. The cutter safely trims your picture to precisely the right size to fit on the tiles, while small fingers never come into contact with a blade. Perfect!
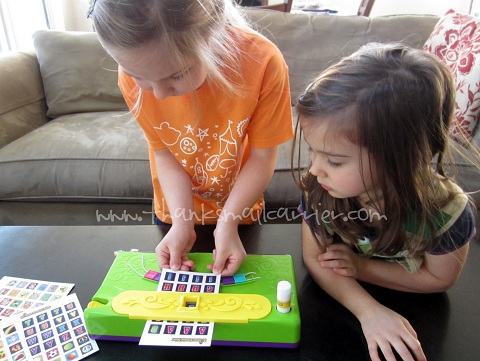
After Big Sister E had cut out all of her images and arranged them in the order of her choosing, it was time to use the included child-safe glue stick to adhere them to each of the tiles.
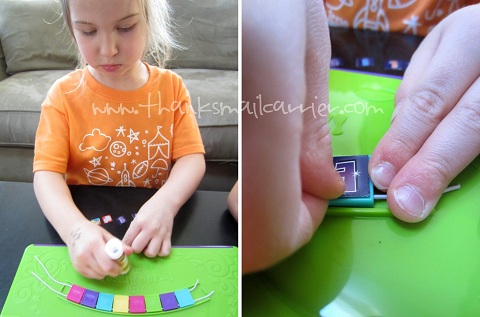
As these colorful tiles are reversible, we then flipped the bracelet over and she was able to affix images to the other side for a completely new look!
Once the tiles were finished, I simply tied the elastic strings together and trimmed the excess. While I attempted to use the included Knot Key Tool to slide the knots into one of the tiles to keep them hidden, I found that simply pulling on the strings also did the trick (although you definitely have to be careful to not pull the knots out, as then the tiles end up sliding off and the trimmed elastic is difficult to thread back through).
After repeating the process with Little Sister B, we set the bracelets aside to dry... although both girls were more than excited to get to wear them right away. We did find that the glue didn't end up holding some of the images on and we needed to reapply a few more layers, but it wasn't long before we were ready to show off our finished creations!

Too cute!
The girls love the way that the elastic strings make these bracelet easy to slip on and off and being able to flip them over to have a totally different look on the other side ends up with twice the fun. Similar to a charm bracelet that tells a story, these Image Bracelets have a way of inspiring and telling all about the owner. Plus, what a great gift to give to a favorite friend to let them know that you care about their interests!
Sold in the Mindware catalog and online at Mindware.com, the My Image Bracelet Maker retails for $29.99 and refill kits (sold separately) sell for $12.95. To find out more about this innovative new product (it has already won the Creative Child Magazine Kids Product of the Year Award 2012 in the Creative Play-Accessories Category!) visit the My Image Bracelet Maker website.
And, thanks to the generosity of Choose Friendship, one person will soon have a great gift for the crafty kid in their life as well, because...
One lucky person will win a My Image Bracelet Maker!

(Enter with the Rafflecopter form below. If you have any questions or problems entering, there is a video tutorial found here that can help.)
a Rafflecopter giveaway
A big thank you to Choose Friendship for providing a My Image Bracelet Maker for me to review as well as for one lucky giveaway winner. The opinions shared are my own and honest and if you really need to see more, click here to see how I roll.